Getting started
Sign-up & setup
Between "I'll just try this out" and your first booked session sit five stations: creating an account, confirming your email, picking a plan, setting a password and completing the setup wizard. Altogether that takes a good quarter of an hour — the wizard itself is done in five minutes if you have your tax details on hand. This page walks through the stations in order.
1. Create an account
Sign-up asks for your Email, First name, Last name, Business name, Country, Phone number and how you run your business — as a sole trader or as a company such as a GmbH or Pty Ltd. TrainerFoundry later carries your phone number and business type over to your Stripe account, so you don't type them in again there. You also state whether you're signing up as an individual or as a business — as a business with your company name and, optionally, your VAT ID — and accept the terms. There's also an automatic bot check; only once it clears can you click Create account.
If you're already signed in to TrainerFoundry in the same browser, the sign-up page shows a notice with the account you're signed in as instead of the form. To create a new account, sign out first via Sign out; Back to the app takes you to your existing account instead. Plan selection and the set-password page show the same notice.
Two of these fields matter longer than they look while you're filling them in. Your business name becomes your organisation's name in TrainerFoundry — it shows up in many places later, though it can be changed. Your country (Germany, Austria, Switzerland or Australia) determines the currency you bill in — euros for Germany and Austria, Swiss francs for Switzerland, Australian dollars for Australia. You can still change the currency in the wizard, but only until your first booking lands in your ledger; after that it's locked.
2. Confirm your email and choose a plan
After submitting, you land on a page that sends you to your inbox. The confirmation link is valid for 24 hours. If nothing arrives, check spam first; after that, Resend verification email helps — the button becomes active after a one-minute wait. If you mistyped your address, go back to the form via Use a different email.
Clicking the link leads to plan selection. You can choose between Starter and Professional, each billed monthly or yearly — yearly billing gets you two months free. Both plans have the exact same full feature set; the only difference is how many active clients you can have (Starter up to 25, Professional unlimited) and your monthly email quota (Starter 500, Professional 5,000 emails). The price shown is the total you pay, marked incl. VAT — or no VAT where no VAT applies to your invoice.
Start free trial hands off to Stripe Checkout. There you enter your billing address and payment method. The trial runs 14 days; you're only charged after that, and you can cancel any time before then — how that works is covered under Subscription & invoices.
3. Set a password
After checkout you see a confirmation page — nothing else happens there. In the background, your user account and your organisation are being created, and a second email is on its way: the invitation to set your password. That one can also take a few minutes and occasionally lands in spam too.
Why the detour? Because your password is never meant to live at TrainerFoundry. The link opens a page that hands it straight to our identity provider; it's stored there and nowhere else. It needs at least eight characters, and a meter under the field estimates its strength — very weak passwords are rejected even if they're long enough. The invitation link is valid for seven days.
After that you're taken to sign in and log in for the first time: with the same email address and the password you just chose.
4. The setup wizard
Your first sign-in doesn't lead to the dashboard — it leads to the setup wizard. And it's mandatory: until it's complete, every other page in the app sends you back here. That's deliberate — without working hours and without tax details, TrainerFoundry can neither offer bookable slots nor write a correct invoice.
- 1 Profile — Your bio, specialisations, certifications and a link to your photo. "Next" requires a filled-in bio on this step — the other fields are optional.
- 2 Business settings — Currency, time zone, working hours, default session length, buffer between sessions, minimum booking lead time and your cancellation terms. "Next" requires at least one day marked as a working day.
- 3 Stripe — The connection to your payout account. You can set it up here or choose "Skip for now" and come back to it later — without it, though, you can’t take payments online.
- 4 Tax — Invoice name, invoice address, optionally your tax ID, your tax scheme and confirming the tax notice. Without a chosen scheme and a confirmed notice, "Next" won’t move you on from here.
- 5 Review — Everything at a glance, with its own badge for Profile, Business settings, Stripe and Tax, plus a "Go to step" link on any open item. "Finish" completes setup and takes you to the dashboard.
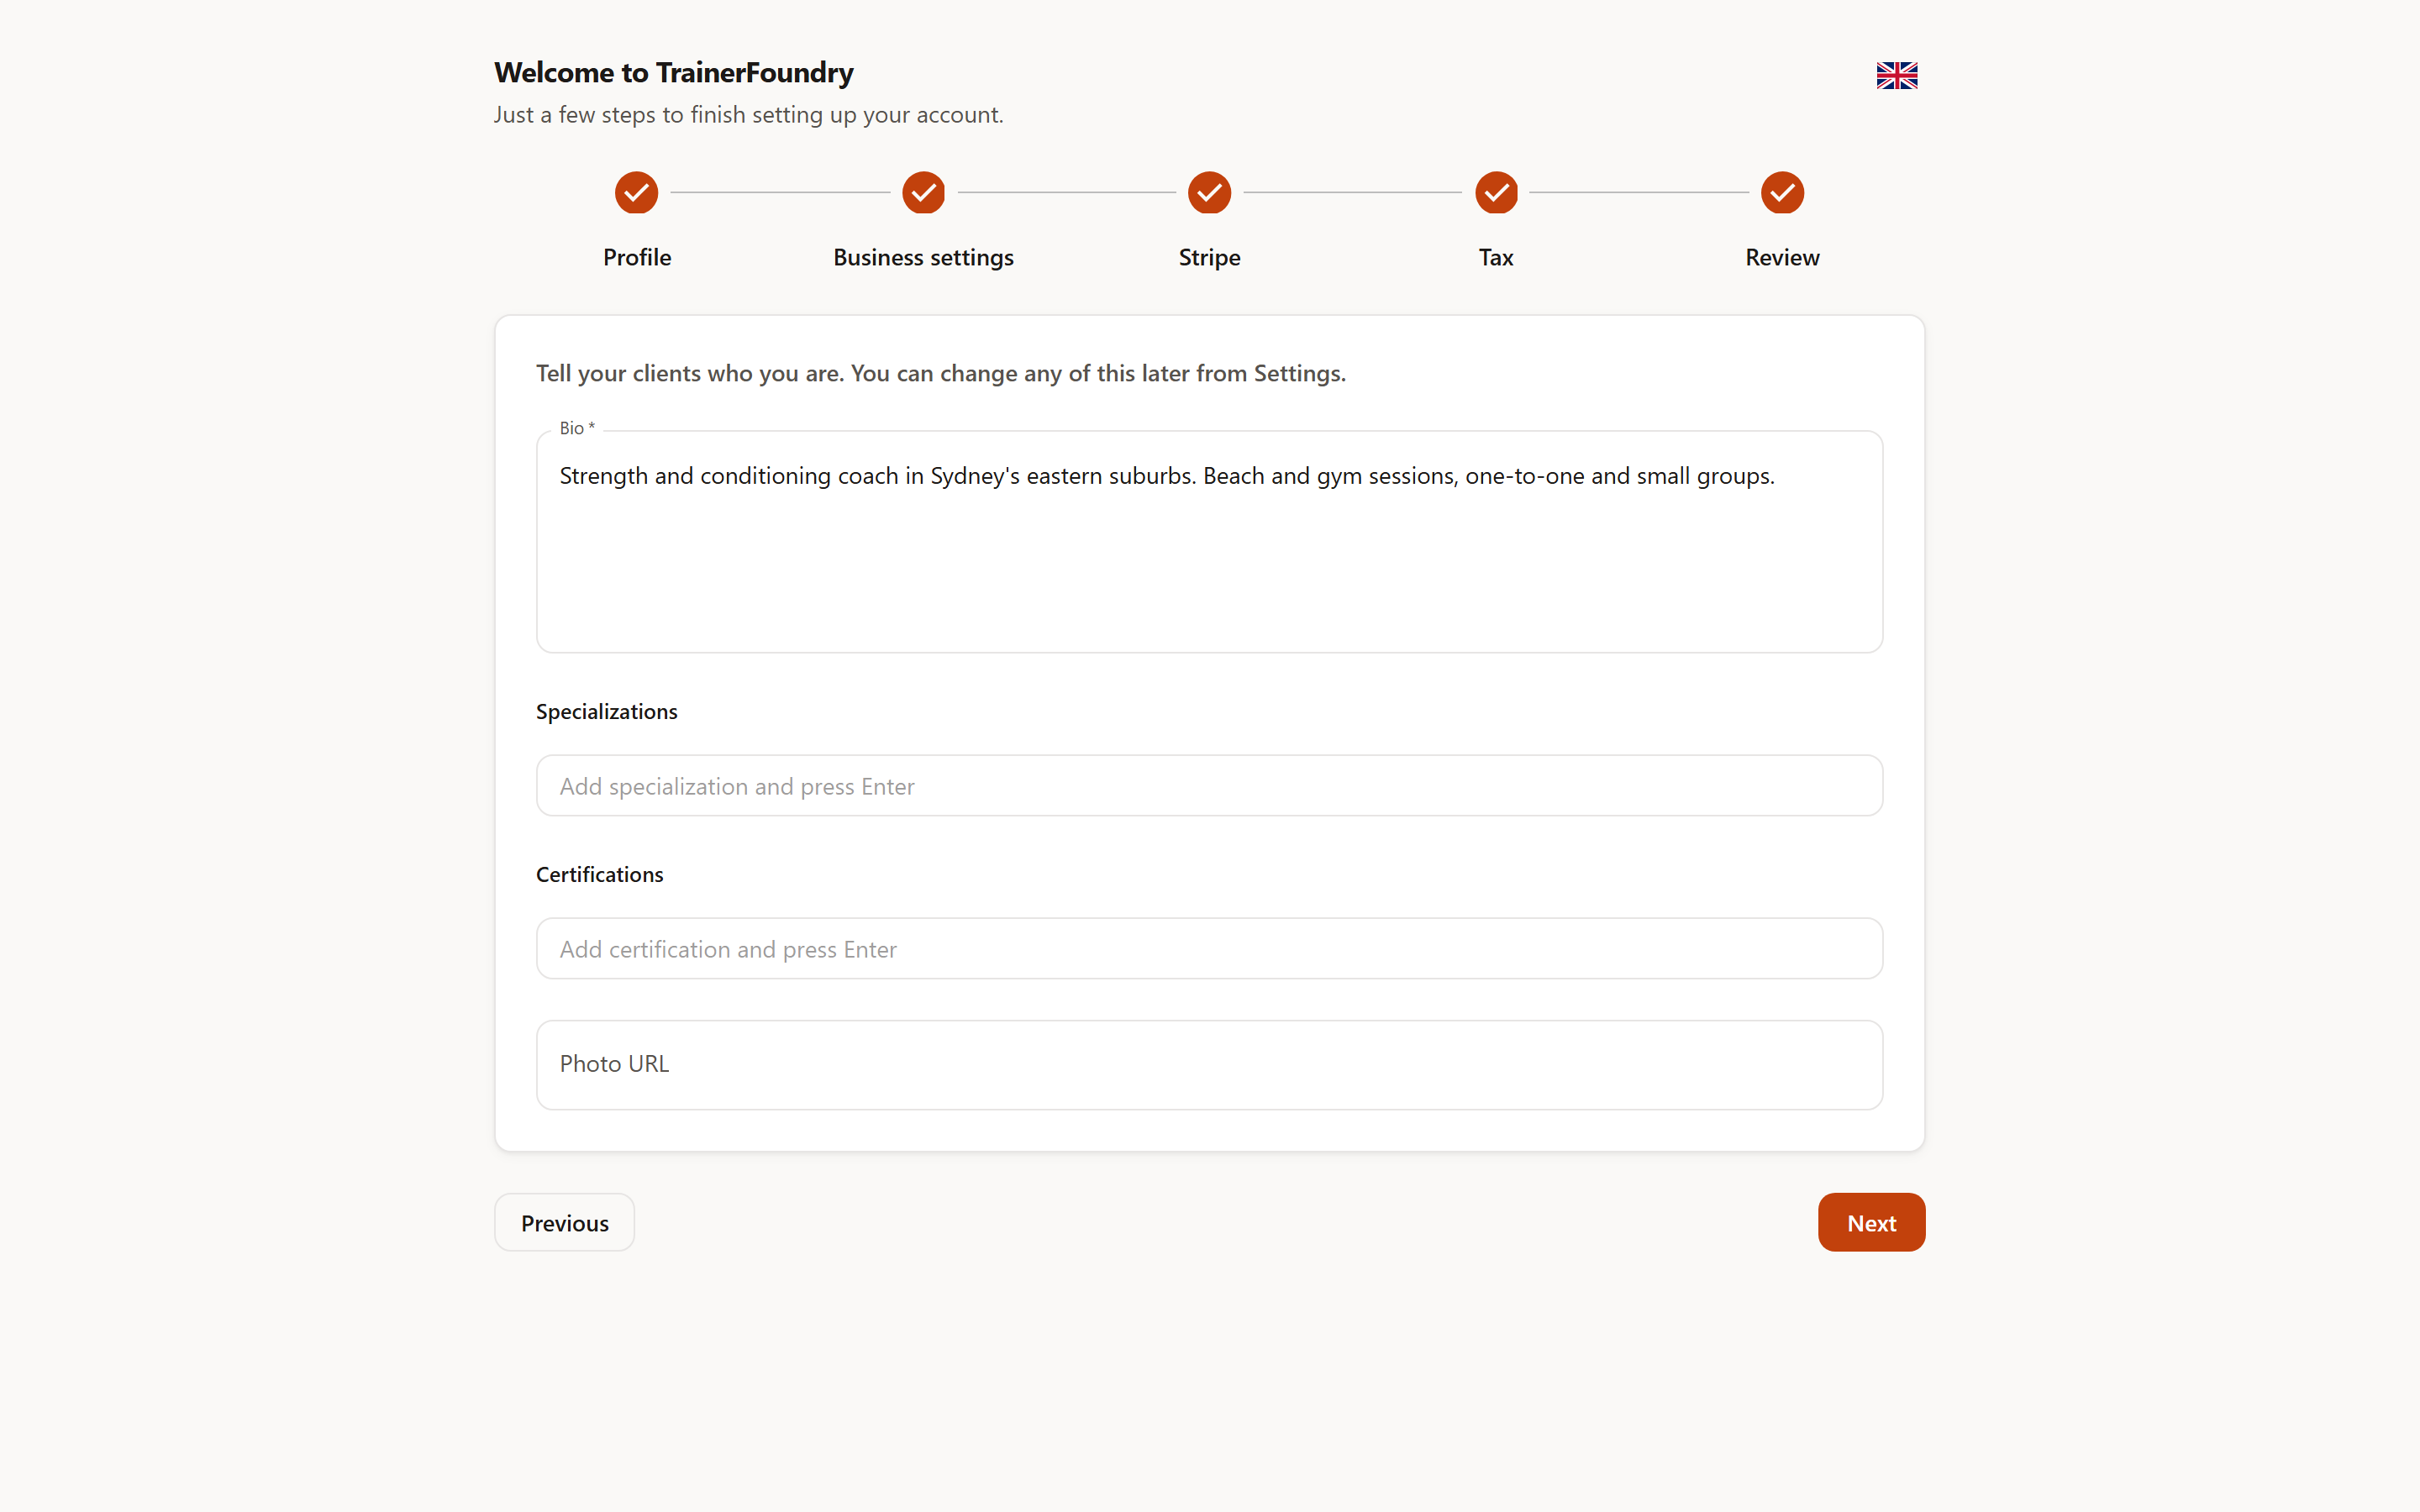
Next saves the current step and moves you one forward — as long as the step's required fields are filled in. If one is missing, the wizard stops and flags the affected field with a message. Previous goes back — if the current step has unsaved changes, it first asks you to confirm discarding them, then refills the fields with whatever is stored on the server. You can close the wizard at any time: whatever is saved stays saved, and the next time you sign in it picks up wherever something is still missing.
The progress bar at the top is also clickable: any step you've already completed or already visited takes you straight there — without re-running the steps in between. Only steps that are still ahead of you stay locked, with one exception: once Profile, Business settings, Stripe and Tax are all done, Review becomes clickable too, even if you've never been there.
On the Stripe step, Connect Stripe opens Stripe's form right inside the wizard — you don't leave TrainerFoundry for it. If details are still missing for it, a short form asks for just those first, such as your invoice legal name and invoice address, the email address for your business card, your phone number or business type; Save and connect Stripe saves them and then opens Stripe's form, which takes them over. After you submit Stripe's form, the wizard shows a progress notice until Stripe has answered, then switches by itself. Next only becomes active on this step once Stripe is either connected or explicitly skipped. Skipping isn't giving something up — you can finish it later under Receiving payments.
On the Tax step, a chosen tax scheme and the confirmed notice are among the conditions that unlock Finish on the last step (more on that in a moment). For an invoice address in Germany, Austria, Switzerland or Australia, all three schemes are available: Standard-rated (you don't enter a tax rate — Stripe Tax calculates the tax), the scheme for a tax-unregistered small business, and Exempt. For any other country, only Exempt is available. The choice controls what appears on your invoices — covered in full under Tax & VAT. None of this is final: everything can be corrected later in Settings.
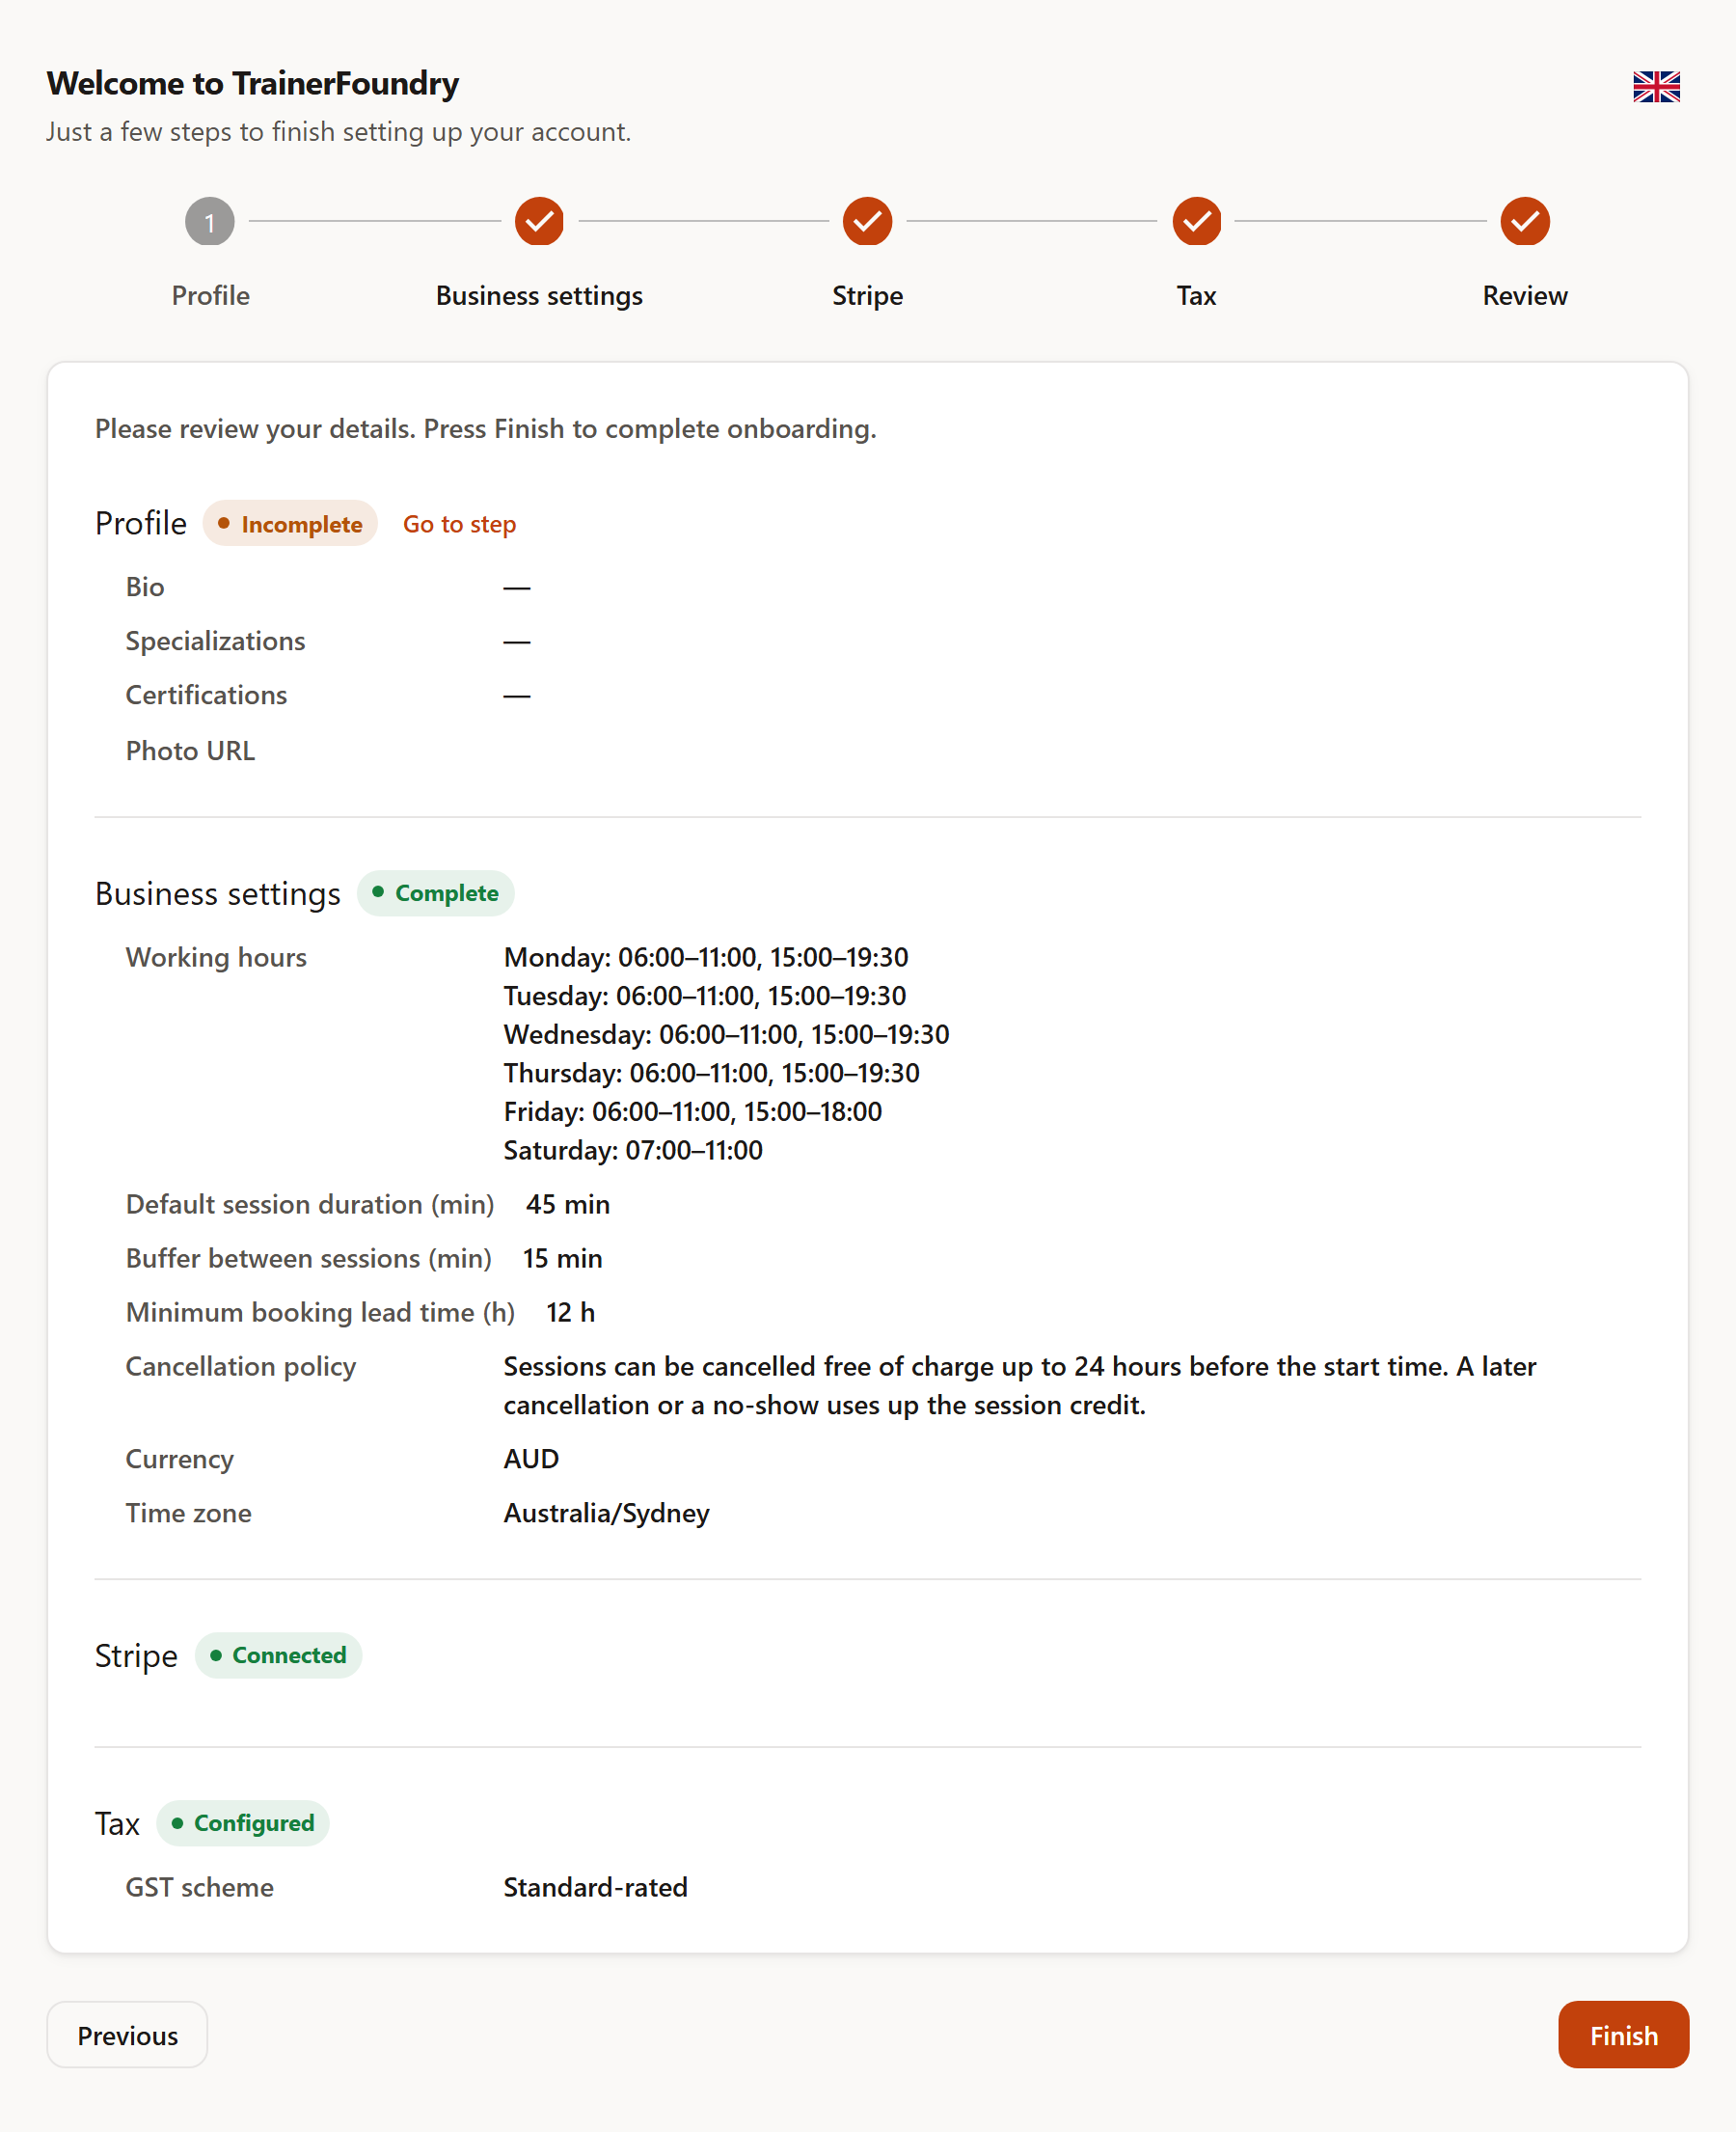
Finish only becomes clickable once all four previous steps meet their own condition: a filled-in bio for Profile, at least one working day for Business settings, a connected or explicitly skipped Stripe step, and a chosen tax scheme with a confirmed notice for Tax. If Finish fails anyway — say because something went missing again in the meantime — the message names the affected step and jumps you there automatically, instead of leaving you stranded on the Review page with no explanation.
5. Once setup is done
After Finish you land on the dashboard — and it's empty, because nothing is there yet. Four things move you forward, in this order:
- 1 Create your services and offers — Without a training type and an offer, there is nothing to sell and nothing to book. This is the first step after setup. See Services & offers.
- 2 Add your clients — Create or import existing clients — with an email address, since invitations, invoices and notifications all depend on it. See Clients.
- 3 Finish connecting Stripe — If you skipped the step: come back to it. Money only reaches you once your Stripe account is verified. See Receiving payments (Stripe).
- 4 Invite clients to the app — After that, your clients book their own sessions, see their credit balance and check in with a QR code. See Client portal access.
Interface and navigation
The app always follows the same layout: the sidebar on the left, a narrow bar at the top with the settings that concern you personally, and the actual page in between. On a phone, the sidebar collapses and comes back via the menu icon at the top left.
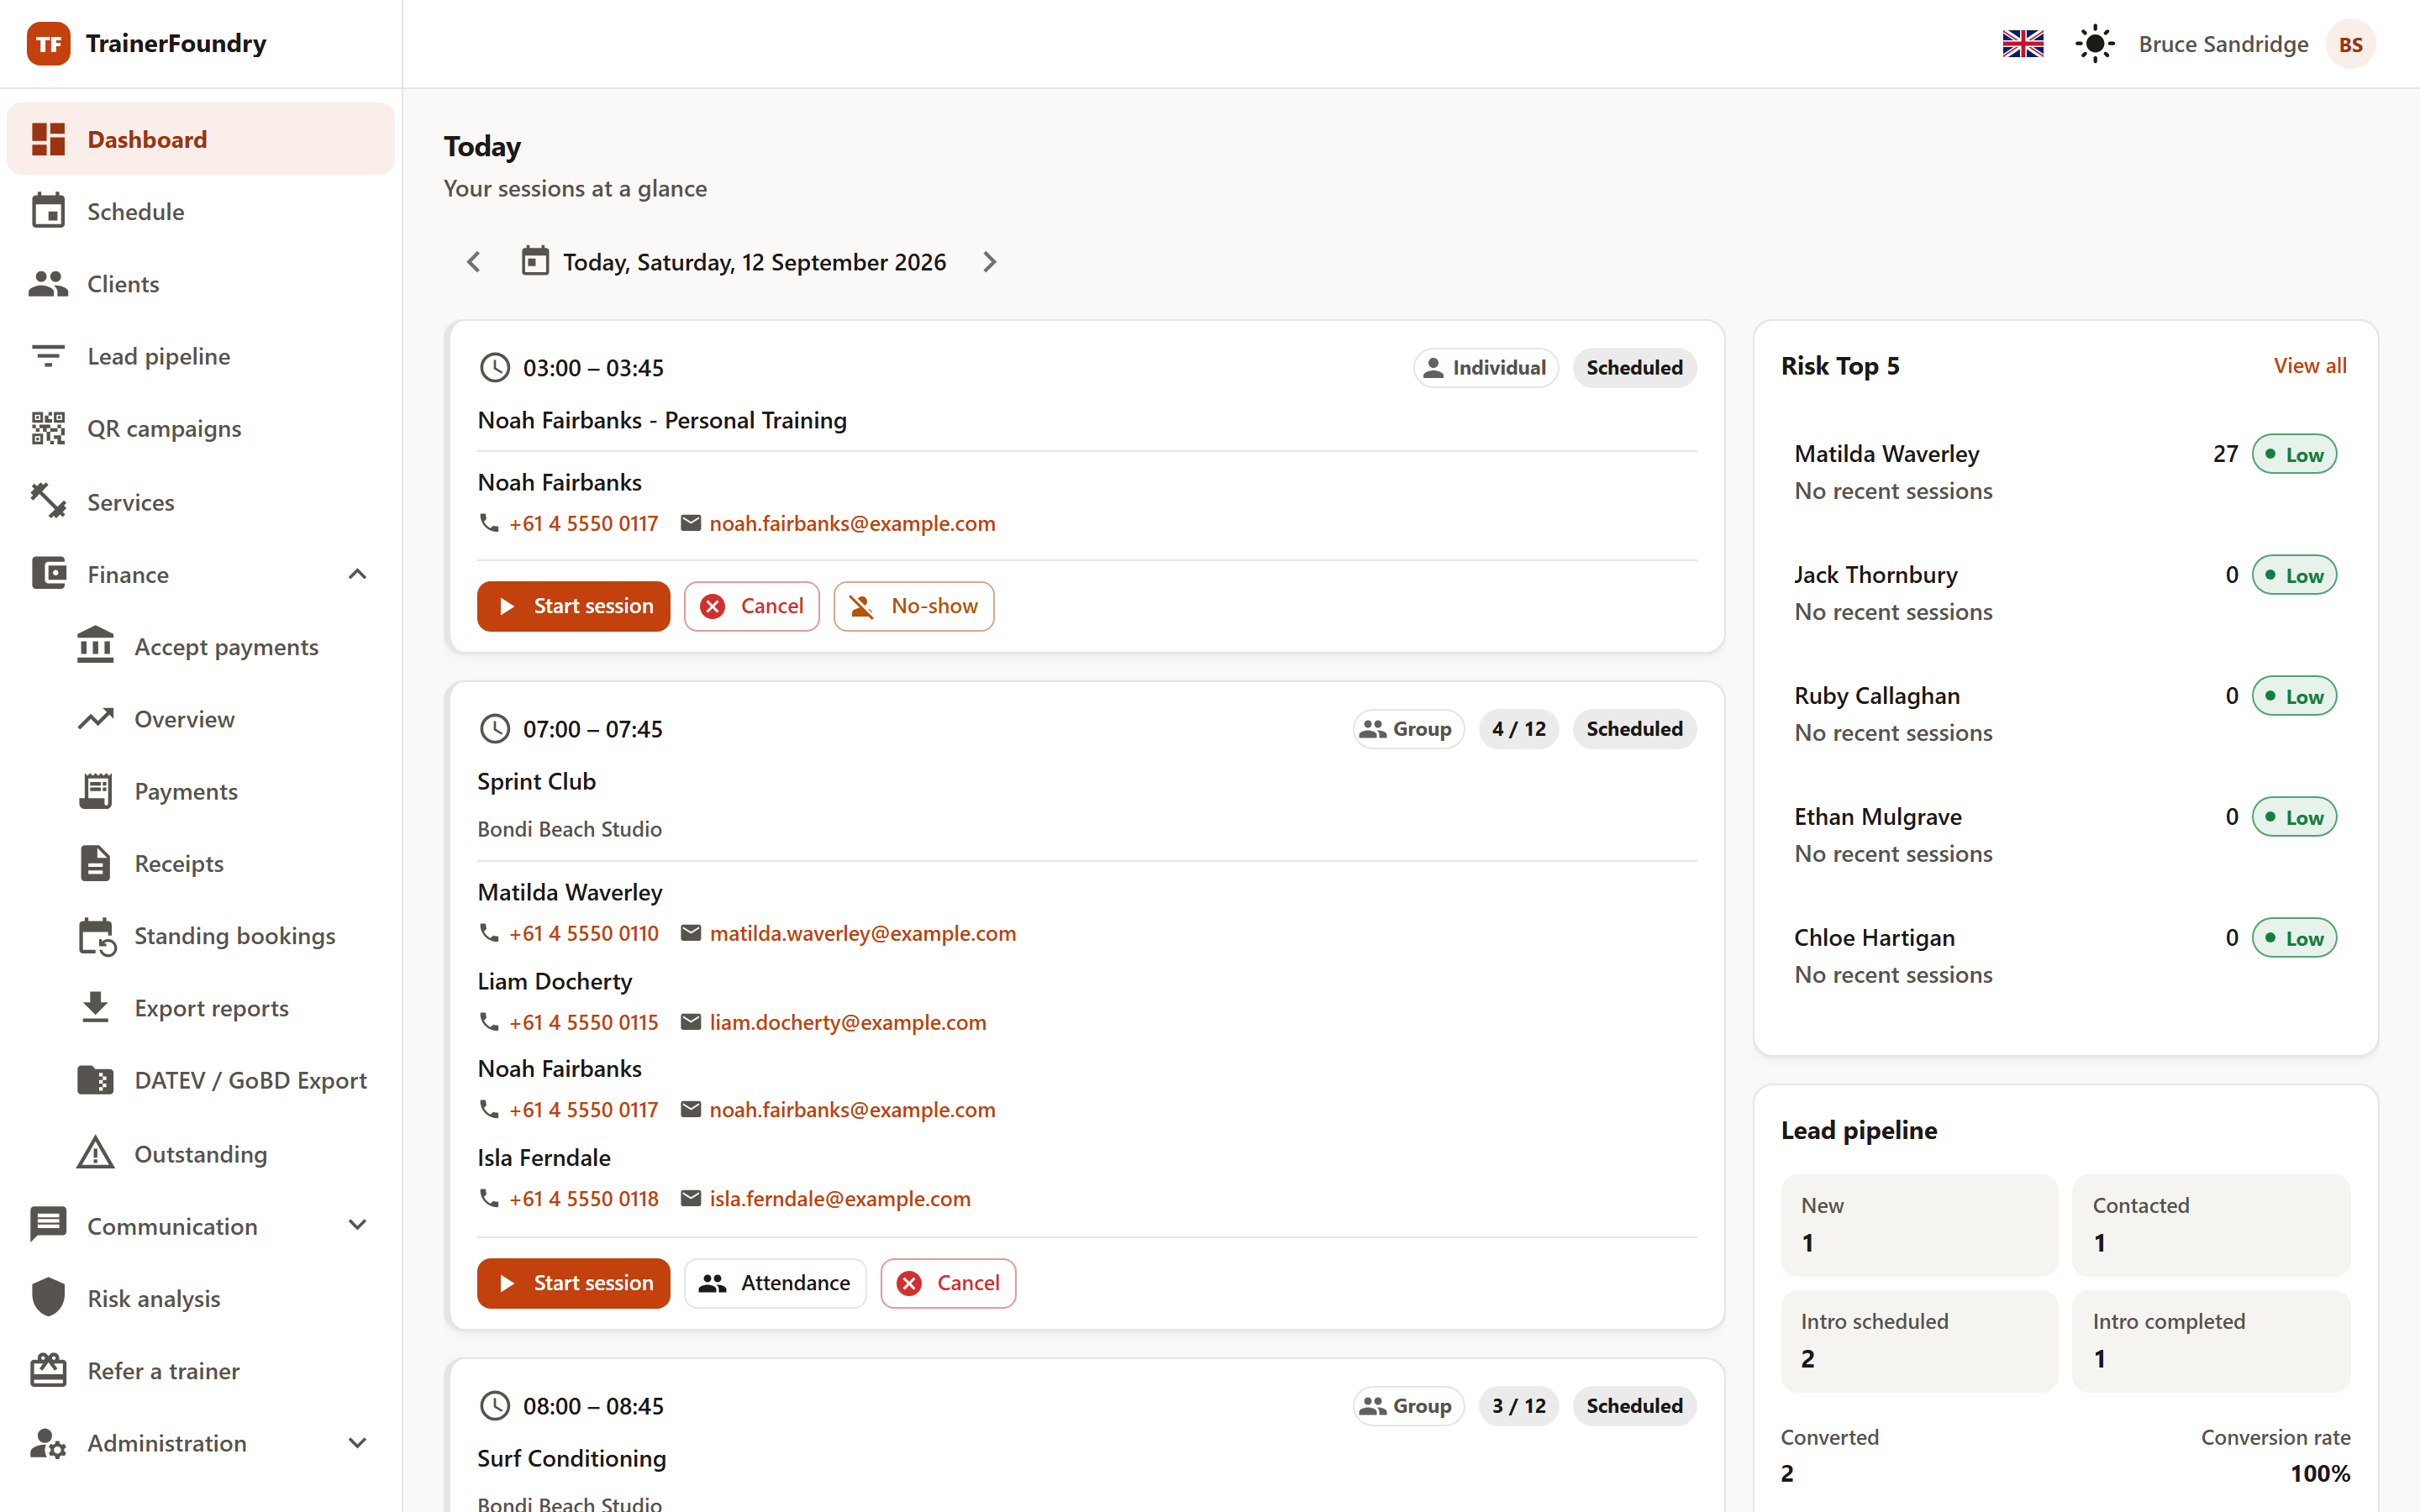
Eight entries stand on their own: Dashboard, Schedule, Clients, Lead pipeline, QR campaigns, Services, Risk analysis and Refer a trainer. The rest sits in three groups you expand and collapse: Finance (Accept payments, Overview, Payments, Standing bookings, Export reports, CSV export, Outstanding), Communication (Messages, Notifications) and Administration (Follow-up rules, Billing, Invoices & receipts, Settings). Which groups are open is remembered across sessions; whichever group you're currently working in is always expanded.
Three switches sit at the top right. The flag switches between German and English, the sun or moon icon sets the theme to Light, Dark or System — where "System" follows your operating system, so it goes dark by itself in the evening. Behind your initials sit Settings and Sign out. Language and theme apply to your account, not your browser — you'll find them the same on every device.